2-DIGIT 7-SEGMENT DISPLAY COUNTER USING BUTTON
Hardware Required
- PICUNO Microcontroller board
- 2 × Single-Digit 7-Segment Display (Common Cathode)
- 2 × Push Buttons
- 2 × 10kΩ resistors (pull-down)
- 7 × 220Ω resistors (Current limiting for LEDs)
- Breadboard
- Jumper wires
- USB cable
Description
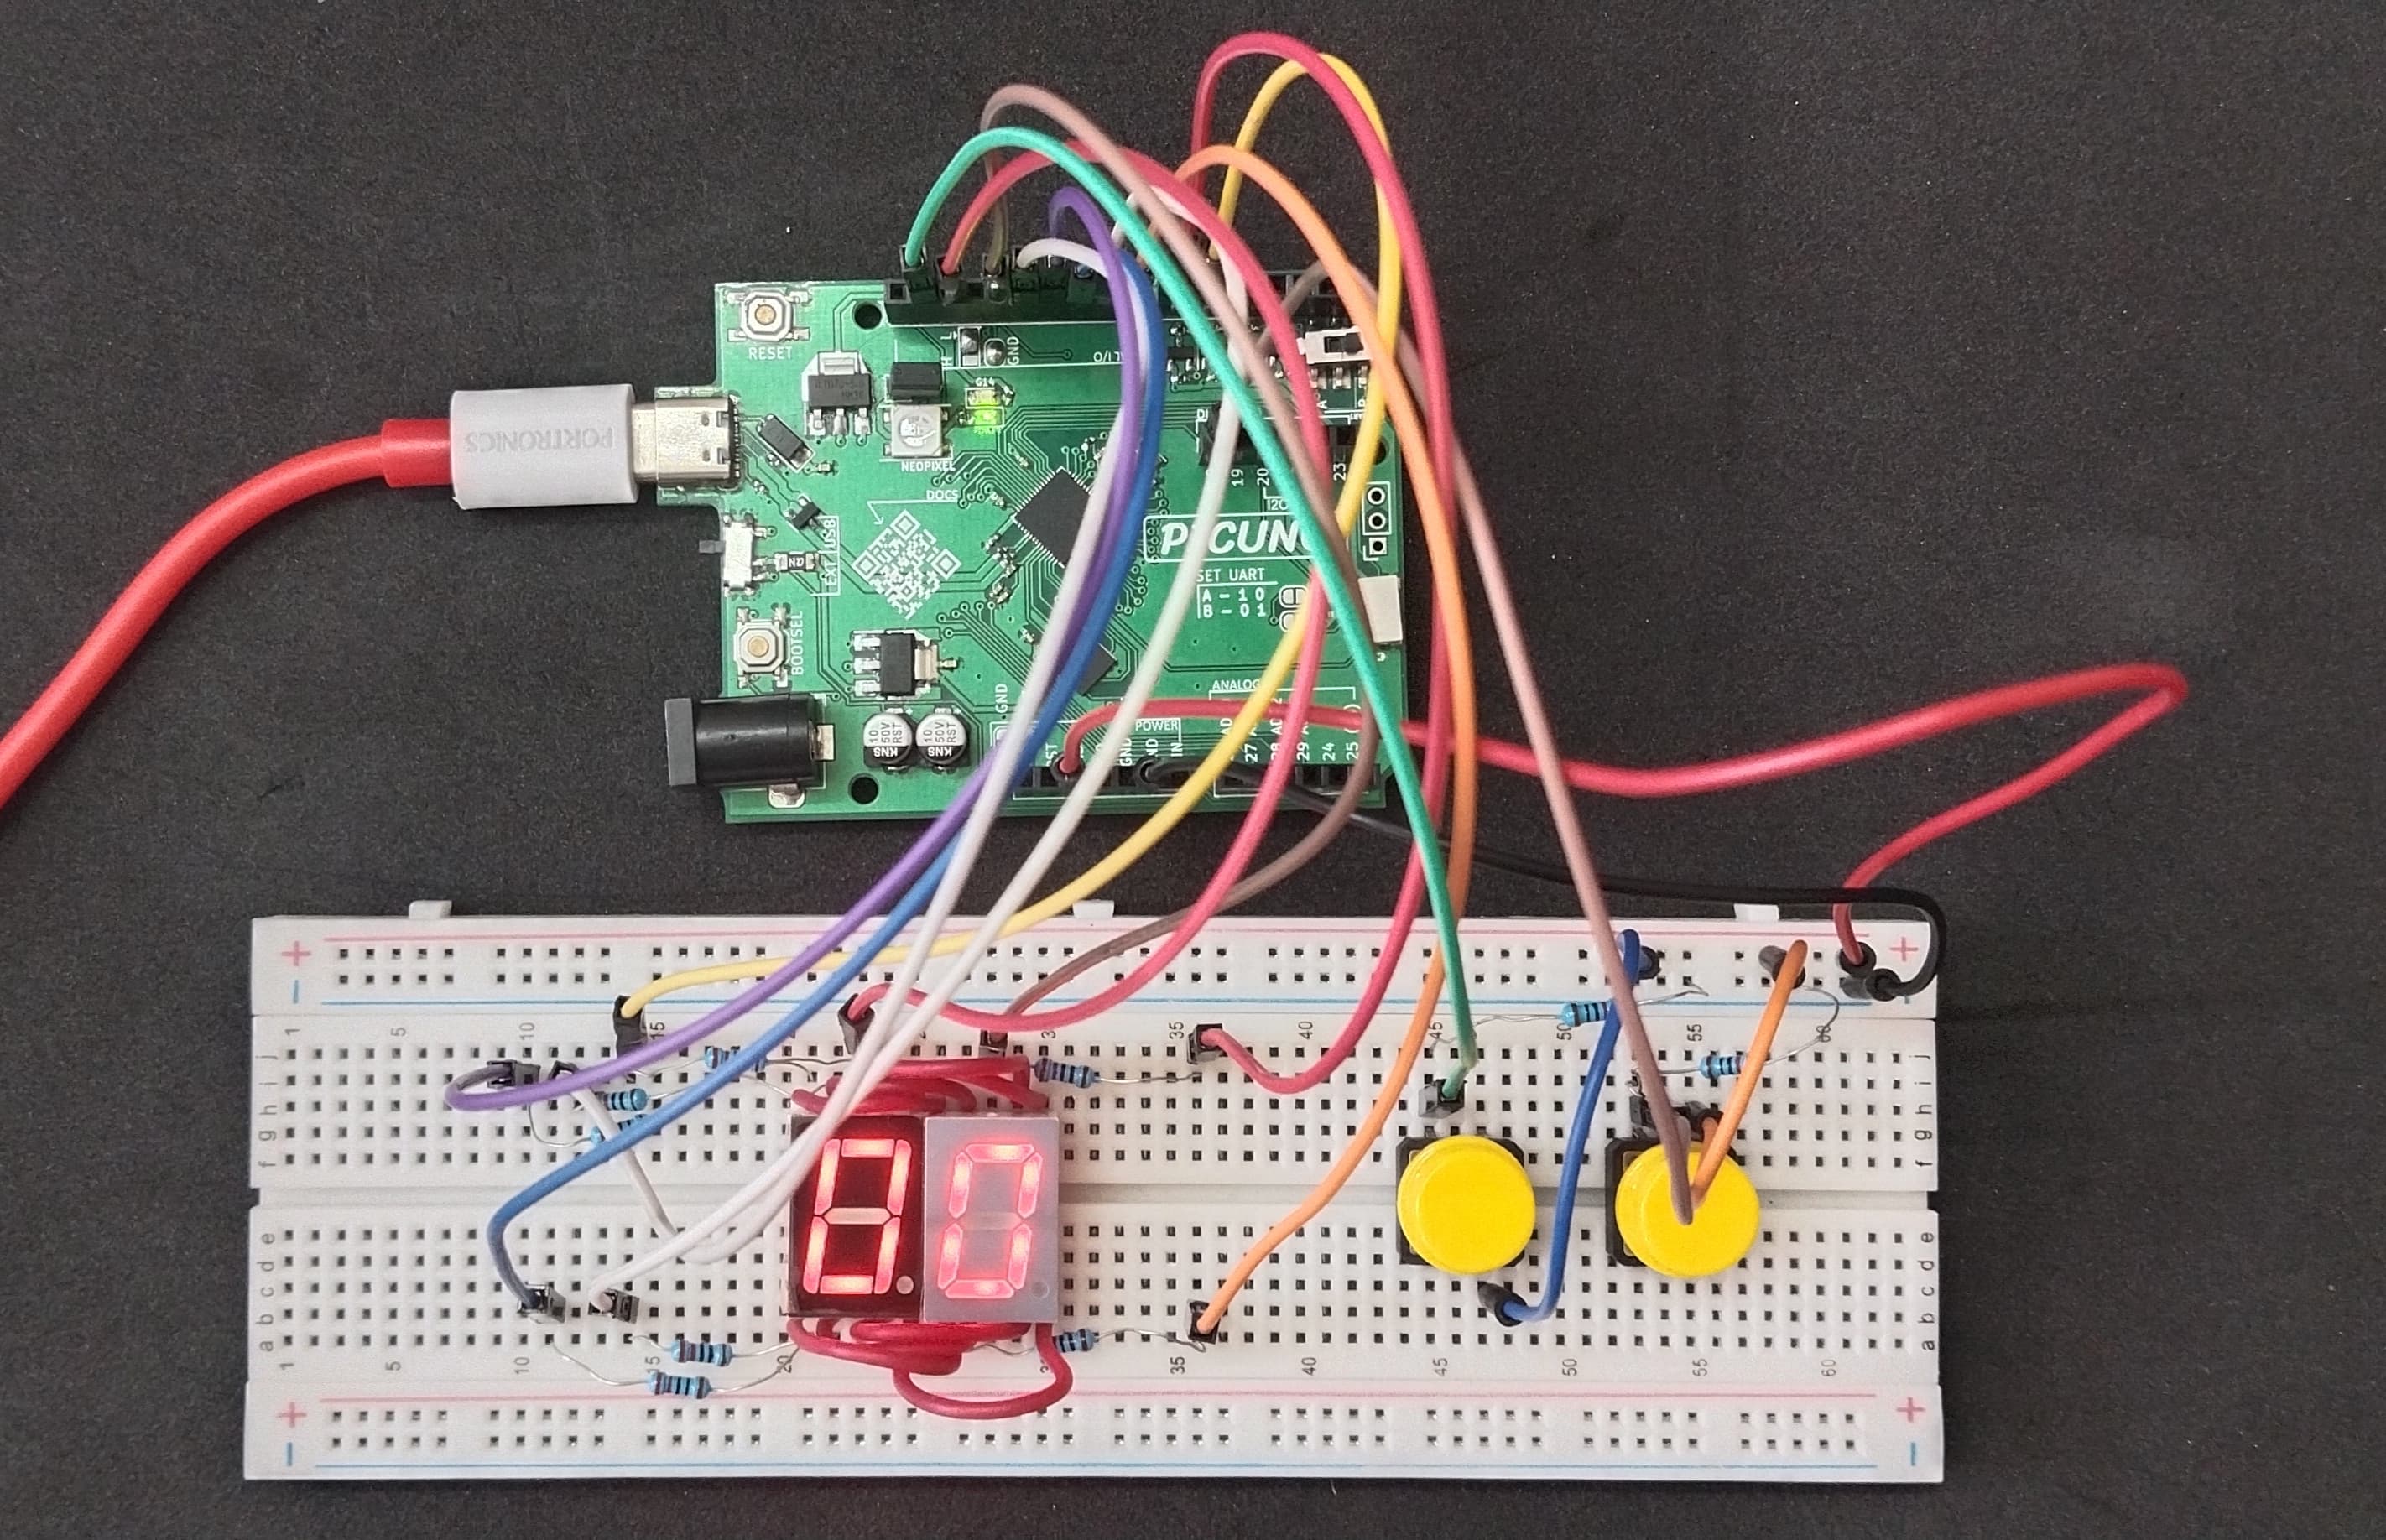
This project implements a 2-digit up/down counter from 00 to 99 using two common cathode 7-segment displays and two push buttons. One button increments the count and the other decrements it. The value is displayed using time-multiplexed switching between the two displays. Segment lines are shared between both displays, while digit control is achieved through GPIO-based multiplexing.
Circuit Diagram
Circuit
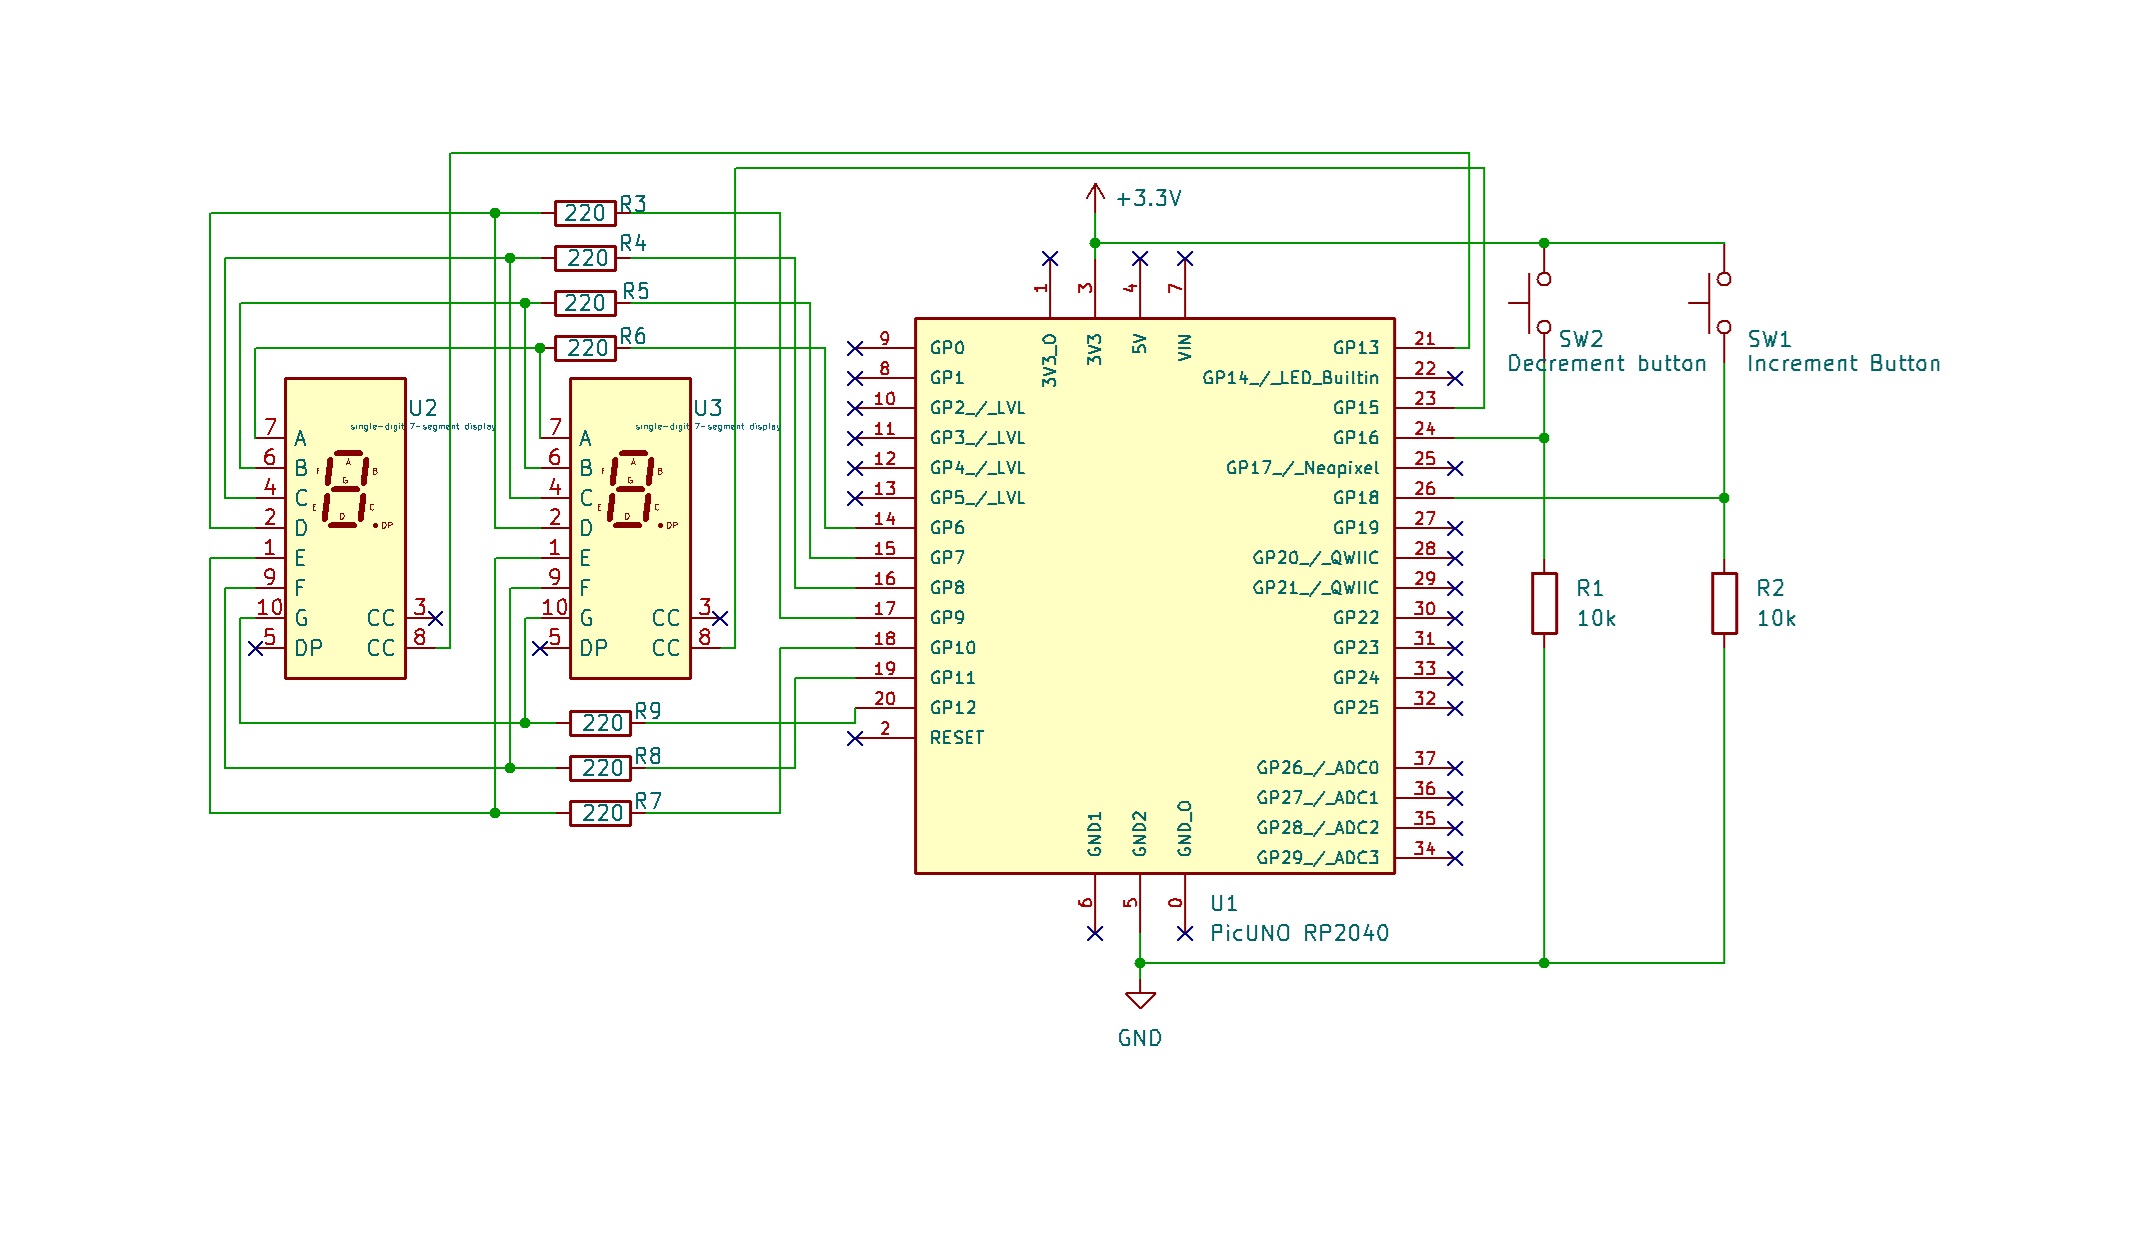
- Connect segment pins A to G of both displays in parallel to GPIO 6 to 12 using 220Ω resistors.
- Connect COM pin of left display to GPIO 13.
- Connect COM pin of right display to GPIO 15.
- Connect one side of both increment and decrement buttons to 3.3 V.
- Connect the other sides of the buttons to GPIO 16 and 18 respectively and connect a 10kΩ resistor from each GPIO to GND.
Schematic
A → 220Ω → GPIO 6
B → 220Ω → GPIO 7
C → 220Ω → GPIO 8
D → 220Ω → GPIO 9
E → 220Ω → GPIO 10
F → 220Ω → GPIO 11
G → 220Ω → GPIO 12
COM (Left Display) → GPIO 13
COM (Right Display) → GPIO 15
Increment Button one side → 3.3 V
Other side → GPIO 16 → 10kΩ → GND
Decrement Button one side → 3.3 V
Other side → GPIO 18 → 10kΩ → GND
Code - C
const int segmentPins[] = {6, 7, 8, 9, 10, 11, 12};
const int digit1 = 13;
const int digit2 = 15;
const int incButtonPin = 16;
const int decButtonPin = 18;
int digits[10][7] = {
{1,1,1,1,1,1,0},
{0,1,1,0,0,0,0},
{1,1,0,1,1,0,1},
{1,1,1,1,0,0,1},
{0,1,1,0,0,1,1},
{1,0,1,1,0,1,1},
{1,0,1,1,1,1,1},
{1,1,1,0,0,0,0},
{1,1,1,1,1,1,1},
{1,1,1,1,0,1,1}
};
int counter = 0;
int lastIncState = 0;
int lastDecState = 0;
void setup() {
for (int i = 0; i < 7; i++) pinMode(segmentPins[i], OUTPUT);
pinMode(digit1, OUTPUT);
pinMode(digit2, OUTPUT);
pinMode(incButtonPin, INPUT);
pinMode(decButtonPin, INPUT);
}
void clearAll() {
for (int i = 0; i < 7; i++) digitalWrite(segmentPins[i], 0);
digitalWrite(digit1, LOW);
digitalWrite(digit2, LOW);
}
void showDigit(int value, int digitPin) {
clearAll();
for (int i = 0; i < 7; i++) digitalWrite(segmentPins[i], digits[value][i]);
digitalWrite(digitPin, HIGH);
delay(4);
clearAll();
}
void loop() {
int tens = counter / 10;
int ones = counter % 10;
showDigit(tens, digit1);
showDigit(ones, digit2);
int incState = digitalRead(incButtonPin);
int decState = digitalRead(decButtonPin);
if (incState == HIGH && lastIncState == LOW) {
counter = (counter + 1) % 100;
lastIncState = HIGH;
delay(200);
} else if (incState == LOW) {
lastIncState = LOW;
}
if (decState == HIGH && lastDecState == LOW) {
counter = (counter - 1 + 100) % 100;
lastDecState = HIGH;
delay(200);
} else if (decState == LOW) {
lastDecState = LOW;
}
}
const int segmentPins[] = {6, 7, 8, 9, 10, 11, 12} - Maps GPIO pins to 7-segment segments a to g.
showDigit(int value, int digitPin) - Displays the given digit on either tens or ones position using multiplexing.
if (buttonState == HIGH && lastButtonState == LOW) - Implements edge detection to prevent multiple increments or decrements on a single button press.
(counter ± 1 + 100) % 100 - Ensures that the counter always stays in the 00–99 range.
Code - Micropython
from machine import Pin
import time
segments = [Pin(i, Pin.OUT) for i in range(6, 13)] # a–g = GPIO 6 to 12
digit1 = Pin(13, Pin.OUT) # Tens place
digit2 = Pin(15, Pin.OUT) # Ones place
inc_button = Pin(16, Pin.IN)
dec_button = Pin(18, Pin.IN)
numbers = [
[1,1,1,1,1,1,0], # 0
[0,1,1,0,0,0,0], # 1
[1,1,0,1,1,0,1], # 2
[1,1,1,1,0,0,1], # 3
[0,1,1,0,0,1,1], # 4
[1,0,1,1,0,1,1], # 5
[1,0,1,1,1,1,1], # 6
[1,1,1,0,0,0,0], # 7
[1,1,1,1,1,1,1], # 8
[1,1,1,1,0,1,1] # 9
]
def set_segments(pattern):
for i in range(7):
segments[i].value(pattern[i])
def clear_all():
for i in range(7):
segments[i].value(0)
digit1.value(0)
digit2.value(0)
def show_digit(digit_val, digit_pin):
clear_all()
set_segments(numbers[digit_val])
digit_pin.value(1)
time.sleep_ms(4)
clear_all()
counter = 0
last_inc = 0
last_dec = 0
while True:
tens = counter // 10
ones = counter % 10
show_digit(tens, digit1)
show_digit(ones, digit2)
if inc_button.value() == 1 and last_inc == 0:
counter = (counter + 1) % 100
last_inc = 1
time.sleep_ms(200)
elif inc_button.value() == 0:
last_inc = 0
if dec_button.value() == 1 and last_dec == 0:
counter = (counter - 1 + 100) % 100
last_dec = 1
time.sleep_ms(200)
elif dec_button.value() == 0:
last_dec = 0
segments = [Pin(i, Pin.OUT) for i in range(6, 13)] - Initializes GPIO 6 to 12 as outputs for the 7 segments (a–g).
show_digit(digit_val, digit_pin) - Activates the specified digit with the appropriate segment pattern and quickly turns it off (multiplexing).
counter = (counter + 1) % 100 and counter = (counter - 1 + 100) % 100 - Ensures the counter wraps correctly from 99 to 00 (or 00 to 99 when decrementing).
if button.value() == 1 and last_state == 0 - Detects rising edge on button press for clean single-step counting.